Friday, August 25, 2017

Dynamically populate a select element from JSON data with jQuery/Ajax

<html>
  <head>
    <script type="text/JavaScript" src="https://ajax.googleapis.com/ajax/libs/jquery/1.6.4/jquery.min.js"></script>
  </head>
  <body>
    <select id="people"></select>
  </body>

The JSON file we’ll be using consists of a collection of ‘person’ data in a valid JSON form, such as:
{"person": [
  {
    "id": "1",
    "name": "Person1"
  },
  {
    "id": "2",
    "name": "Person2"
  },
  {
    "id": "3",
    "name": "Person3"
  }

]}

  <script type="text/JavaScript">

//getJSON
    //get a reference to the select element
    var $select = $('#people');
    //request the JSON data and parse into the select element
    $.getJSON('person.JSON', function(data){
      //clear the current content of the select
      $select.html('');
      //iterate over the data and append a select option
      $.each(data.person, function(key, val){
        $select.append('<option id="' + val.id + '">' + val.name + '</option>');
      })
    });

//AJAX
//get a reference to the select element
$select = $('#people');
//request the JSON data and parse into the select element
$.ajax({
  url: 'person.JSON',
  dataType:'JSON',
  success:function(data){
    //clear the current content of the select
    $select.html('');
    //iterate over the data and append a select option
    $.each(data.person, function(key, val){
      $select.append('<option id="' + val.id + '">' + val.name + '</option>');
    })
  },
  error:function(){
    //if there is an error append a 'none available' option
    $select.html('<option id="-1">none available</option>');
  }

});
  </script>
</html>
https://developerdan77.wordpress.com/2011/10/14/dynamically-populate-a-select-element-from-json-data-with-jquery/

Thursday, May 11, 2017

Enable gzip compression

Enable compression via .htaccess

For most people reading this, compression is enabled by adding some code to a file called .htaccess on their web host/server. This means going to the file manager (or wherever you go to add or upload files) on your webhost.
The .htaccess file controls many important things for your site. If you are not familiar with the .htaccess file, please read my working with .htaccess article to get some know how before changing it.
The code below should be added to your .htaccess file...
<ifModule mod_gzip.c>
mod_gzip_on Yes
mod_gzip_dechunk Yes
mod_gzip_item_include file .(html?|txt|css|js|php|pl)$
mod_gzip_item_include handler ^cgi-script$
mod_gzip_item_include mime ^text/.*
mod_gzip_item_include mime ^application/x-javascript.*
mod_gzip_item_exclude mime ^image/.*
mod_gzip_item_exclude rspheader ^Content-Encoding:.*gzip.*
</ifModule>
Save the .htaccess file and then refresh your webpage.
Check to see if your compression is working using the Gzip compression tool.

Enable compression on Apache webservers

The instructions and code above will work on Apache. If they are not working there is another way that may work for you. If the above code did not seem to work, remove it from your .htaccess file and try this one instead...
AddOutputFilterByType DEFLATE text/plain
AddOutputFilterByType DEFLATE text/html
AddOutputFilterByType DEFLATE text/xml
AddOutputFilterByType DEFLATE text/css
AddOutputFilterByType DEFLATE application/xml
AddOutputFilterByType DEFLATE application/xhtml+xml
AddOutputFilterByType DEFLATE application/rss+xml
AddOutputFilterByType DEFLATE application/javascript
AddOutputFilterByType DEFLATE application/x-javascript

Enable compression on NGINX webservers

To enable compression in NGINX you will need to add the following code to your config file
gzip on;
gzip_comp_level 2;
gzip_http_version 1.0;
gzip_proxied any;
gzip_min_length 1100;
gzip_buffers 16 8k;
gzip_types text/plain text/html text/css application/x-javascript text/xml application/xml application/xml+rss text/javascript;

# Disable for IE < 6 because there are some known problems
gzip_disable "MSIE [1-6].(?!.*SV1)";

# Add a vary header for downstream proxies to avoid sending cached gzipped files to IE6
gzip_vary on;

Monday, August 29, 2016

How to Check Your Motherboard Model Number on Your Windows PC

Whether you need to update drivers, want to check hardware compatibility, or you’re just curious, it’s way easier to check your motherboard model number with these simple tricks than it is to crack open your computer case to check the board itself. Read on as we show you how to check your motherboard model number from the comfort of your keyboard.

Why Do I Want To Do This?

There are a variety of situations where knowing your motherboard’s model number is important: upgrading your drivers, buying new hardware (you’ll need the proper expansion slots for card-based upgrades and the right memory DIMMS for memory upgrades, etc.), and checking the capabilities of your board if you’re considering upgrading the entire thing.
If you kept the paperwork that came with your computer (or the individual components if you built it yourself) you can often times reference that. Even then, it’s best to check to make sure the documentation is correct. Rather than open the case and search for the model number, it’s easy to use tools within Windows to check things out.

Checking Your Model Number via CMD.exe

If you’re comfortable using the command line, you can easily check a variety of motherboard and hardware stats using the handy Windows Management Instrumentation Command-line (WMIC) a command-line interface for Microsoft’s powerful WMI tool.

Tuesday, August 9, 2016

Configure Gmail to send/receive email via your Hostgator Email

Configure Gmail to send/receive email via your Hostgator Email 


How To Set Up A Business Email Through Gmail For Free


Sunday, June 26, 2016

How to Block Facebook – Youtube and Other sites using L7 (Layer7) - Mikrotik Router

Below i will show you how to block facebook and youtube sites using Mikrotik L7 Protocols (Layer 7). here i use RouterBoardOS RB1100.

STEP 1:
you have to create new Regexp rule at Layer7 Protocols by Press  , and name it as “DENIED” (withoue quote), see details below:
You can Copy & Paste the code above at below:
^.+(facebook.com|youtube).*$
STEP 2:
Now create Filter Rules, as follow:
At General Tabs for Chain, Please Choose : Foward
At Advanced tabs, select ‘DENIED’ (rule that you have
create at step 1) for Layer7 Protocols
Choose Action ‘DROP’
And At last, your Filter rule to block facebook and youtube should have effected to your network.
try to access facebook & youtube, and you will see that the two sites will not able to access.
this can be see from the filter rule you have created, it will catch the bytes for denied sites in your network.

Mikrotik Port Fowarding Tutorial

Mikrotik Port Fowarding - Port Fowarding is one of the features of the mikrotik router (RB450g, RB750g, RB1100Ahx and other mikrotik router series). Port Fowarding on mikrotik router is used to redirects from destination address (external ip address/ ip WAN Public) to source address ( internal ip address / IP LAN) based on port number. This technique is most often used to make a host (such us web server, ftp server, ssh server, personal pc and other network devices)  that is on the internalnetwork can be accessed via the external network (the Internet) and protected without going through adial-up VPN or other type of vpn. 


How to settings or configure port fowarding on web server

Standart ports web server is TCP 80 (http) and 443 (https). Many network devices can be accessed via web based by using port TCP 80 and other port, for example cctv, ip camera, dvr, and other. This example will show you how to foward port web server (tcp 9000) to destination NAT. 107.18.22.12 is the example WAN IP address and 192.168.100.1 is the desired internal destination ip address.

Fowarding port using winbox 

1. Login to mikrotik router using winbox application
2. Go to IP => Firewall => NAT . Add new NAT Rule

Mikrotik Port Fowarding

On General Tab 
Chain = dstnat
Dst. Address = WAN IP Address Mikrotik Router
Protocol = TCP
Dst. Port = 9000 / you can change it.
Mikrotik Port Fowarding

On Tab Action 
Action = dst-nat
To Address = Internal destination ip address (Web Server Ip address)
To Port = default port (for example port 80)

Mikrotik Port Fowarding FTP Server, SSH Server, Mail Server, RDP (Remote Desktop Protocol), and RTSP (Real Time Streaming Protocol).

Default Port List Network Protocol

1. FTP Server = 20 & 21 TCP
2. SSH Server = 22
3. Mail Server = POP3 - port 110, IMAP - port 143, SMTP - port 25, HTTP - port 80, Secure SMTP (SSMTP) - port 465, Secure IMAP (IMAP4-SSL) - port 585, IMAP4 over SSL (IMAPS) - port 993, Secure POP3 (SSL-POP) - port 995
4. RDP (Remote Desktop) =    TCP port 3389 and UDP port 3389
5. RSTP (Real Time Streaming Protocol) = TCP port 554, UDP Port 3389

How to Setup / configure port fowarding on mikrotik router  

On To Port text field, enter default port of network protocol that will be forwarded

Mikrotik Port Fowarding

If the mikrotik port forwarding not working, please disable or change the  ftp port, ssh port , and wwwport on IP Service List ( IP => Services). See the capture below :


Mikrotik Port Fowarding

How to reset to factory default Mikrotik Router

If you messed up with the configuration on your MikroTik routers or RouterOS devices, which you cannot login to the router to manage it any more, you can reset the router to its factory default settings to gain back the access. The administrator account can also be reset with this way.
Please be informed that you will lose all the configuration and any other data on the router after you reset it, please proceed with caution.
Most MikroTik devices are fitted with a reset button. Look for the reset button labeled with “RES” on your MikroTik router.
  1. Turn off the device power.
  2. Hold the reset button and do not release.
  3. Turn on the device power and wait until the USER LED labeled with “ACT” starts flashing.
  4. Now release the button to clear configuration.
  5. Wait for a few minutes for the router to clear and restore the factory settings.
If you release the reset button after the LED stops flashing, you have to redo everything again.
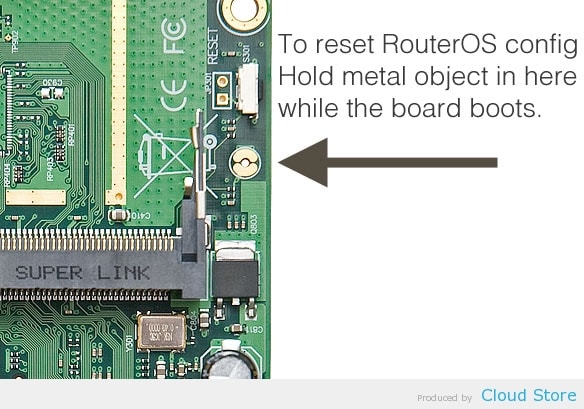
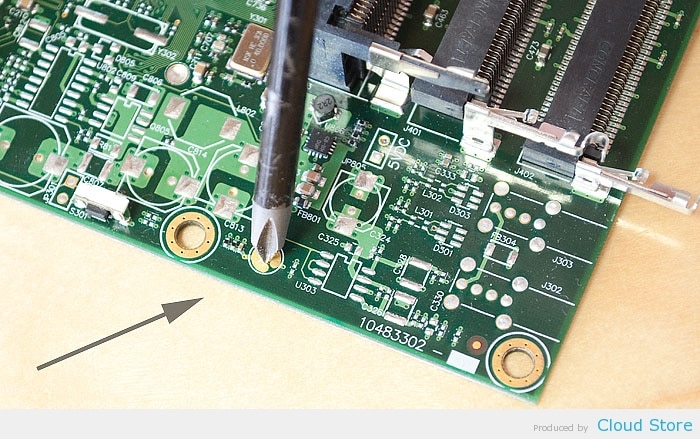
Other than the reset button, you can also reset the device with jumper hole. Almost all MikroTik models are fitted with a reset jumper hole. Some might need opening of enclosure, RB750/RB951/RB751 have the jumper hole under one of the rubber feet of the enclosure.
Close the jumper with a metal screwdriver, and boot the board until the configuration is cleared.