Sunday, June 26, 2016

Mikrotik Port Fowarding Tutorial

Mikrotik Port Fowarding - Port Fowarding is one of the features of the mikrotik router (RB450g, RB750g, RB1100Ahx and other mikrotik router series). Port Fowarding on mikrotik router is used to redirects from destination address (external ip address/ ip WAN Public) to source address ( internal ip address / IP LAN) based on port number. This technique is most often used to make a host (such us web server, ftp server, ssh server, personal pc and other network devices)  that is on the internalnetwork can be accessed via the external network (the Internet) and protected without going through adial-up VPN or other type of vpn. 


How to settings or configure port fowarding on web server

Standart ports web server is TCP 80 (http) and 443 (https). Many network devices can be accessed via web based by using port TCP 80 and other port, for example cctv, ip camera, dvr, and other. This example will show you how to foward port web server (tcp 9000) to destination NAT. 107.18.22.12 is the example WAN IP address and 192.168.100.1 is the desired internal destination ip address.

Fowarding port using winbox 

1. Login to mikrotik router using winbox application
2. Go to IP => Firewall => NAT . Add new NAT Rule

Mikrotik Port Fowarding

On General Tab 
Chain = dstnat
Dst. Address = WAN IP Address Mikrotik Router
Protocol = TCP
Dst. Port = 9000 / you can change it.
Mikrotik Port Fowarding

On Tab Action 
Action = dst-nat
To Address = Internal destination ip address (Web Server Ip address)
To Port = default port (for example port 80)

Mikrotik Port Fowarding FTP Server, SSH Server, Mail Server, RDP (Remote Desktop Protocol), and RTSP (Real Time Streaming Protocol).

Default Port List Network Protocol

1. FTP Server = 20 & 21 TCP
2. SSH Server = 22
3. Mail Server = POP3 - port 110, IMAP - port 143, SMTP - port 25, HTTP - port 80, Secure SMTP (SSMTP) - port 465, Secure IMAP (IMAP4-SSL) - port 585, IMAP4 over SSL (IMAPS) - port 993, Secure POP3 (SSL-POP) - port 995
4. RDP (Remote Desktop) =    TCP port 3389 and UDP port 3389
5. RSTP (Real Time Streaming Protocol) = TCP port 554, UDP Port 3389

How to Setup / configure port fowarding on mikrotik router  

On To Port text field, enter default port of network protocol that will be forwarded

Mikrotik Port Fowarding

If the mikrotik port forwarding not working, please disable or change the  ftp port, ssh port , and wwwport on IP Service List ( IP => Services). See the capture below :


Mikrotik Port Fowarding

How to reset to factory default Mikrotik Router

If you messed up with the configuration on your MikroTik routers or RouterOS devices, which you cannot login to the router to manage it any more, you can reset the router to its factory default settings to gain back the access. The administrator account can also be reset with this way.
Please be informed that you will lose all the configuration and any other data on the router after you reset it, please proceed with caution.
Most MikroTik devices are fitted with a reset button. Look for the reset button labeled with “RES” on your MikroTik router.
  1. Turn off the device power.
  2. Hold the reset button and do not release.
  3. Turn on the device power and wait until the USER LED labeled with “ACT” starts flashing.
  4. Now release the button to clear configuration.
  5. Wait for a few minutes for the router to clear and restore the factory settings.
If you release the reset button after the LED stops flashing, you have to redo everything again.
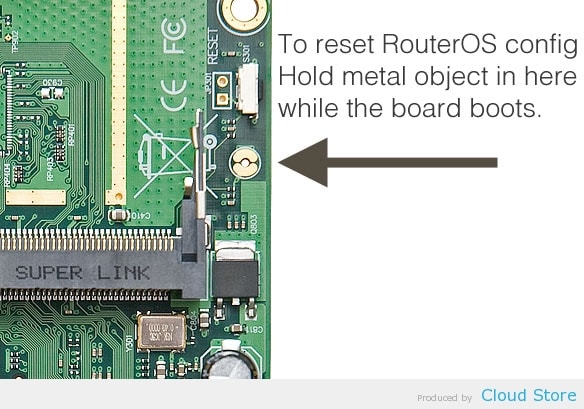
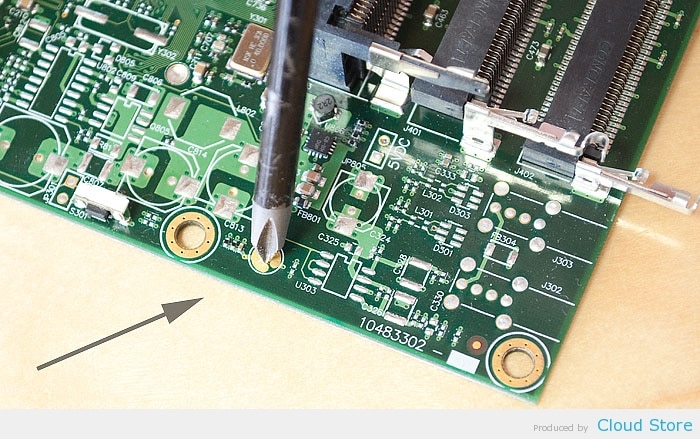
Other than the reset button, you can also reset the device with jumper hole. Almost all MikroTik models are fitted with a reset jumper hole. Some might need opening of enclosure, RB750/RB951/RB751 have the jumper hole under one of the rubber feet of the enclosure.
Close the jumper with a metal screwdriver, and boot the board until the configuration is cleared.

Monday, November 10, 2014

How To Host Sub-Domain On Different Hosting Account

How to hoste Sub-domain on Other hosting company:

In my case, I decided to host my forum on Bluehost hosting, and keep my main blog on WPEngine only. This way, I will avoid the huge charges of WPEngine (Their Billing plan works on number of visits), and this will make more sense in term of server load. Here is the exact steps I followed, and it will work with almost all the hosting and domain registrar.
In my scenario: My Domain is hosted on ShoutMyDomain and blog is hosted on WpEngine. And my goal was to host forum.shoutmeloud.com on Bluehost hosting.

Monday, September 8, 2014

How to type Khmer Unicode ver1_km

យូនីកូត​គឺ​ជា​គ្រោង​ការណ៍​បម្លែង​កូដ​ជា​អក្សរ​សកល​សម្រាប់​វាយ​អក្សរ និង​អត្ថបទ​ដែល​កំណត់​នូវ​វីធី​ជាប់​លាប់​នៃ​ការ​បម្លែង​កូដ ប្រើ​បាន​ច្រើន​ភាសារ ដែល​អាច​ផ្លាស់​ប្តូរ​ទិន្នន័យ​អត្ថបទ ជា​អន្តរជាតិ និង​បង្កើត​មូលដ្ឋាន​គ្រិះ​សំរាប់​ផ្នែក​ទន់​ជា​សកល។
How to use Khmer Unicode by Nida: https://www.dropbox.com/s/64fbdpopy4z6185/How_to_type_Khmer_Unicode_ver1_1km.pdf?dl=0

Khmer Unicode Keyboard (Nida):
https://www.dropbox.com/s/smgve75v39nku7p/KhmerUnicodeKeyboardLayout.pdf?dl=0

Khmer Unicode Keyboard (Windows):
https://www.dropbox.com/s/3g5rxj40mh02oqz/keyboard-Windows.pdf?dl=0

Khmer Unicode Typing: https://www.dropbox.com/s/727az6vo69p13bc/KhmerUnicodeTyping1.6.0.exe?dl=0

Friday, May 2, 2014

Auto sync two mysql tables with exception

Auto sync two mysql tables with exception

-- this is comment in SQL language (line starts with --)
CREATE EVENT event_daily_copy_something
    ON SCHEDULE
      EVERY 1 DAY
    COMMENT 'This text will appear in MySQL Workbench as description of event'
    DO
      BEGIN
        INSERT INTO your_db_name.target_table_name(id, field)
          SELECT id, something
            FROM your_db_name.source_table_name
            WHERE id = 3;
      END

Synchronization of tables is quite complicated. I think you need few operations in event.
  1. Check for new rows and copy
  2. Check for deleted rows and delete them in "copy" table
  3. Check for changed rows (here trigger on source table would be very useful, because trigger "knows" what row is edited and you can access new field values in table 1 and use them to update table 2).

Thursday, May 1, 2014

How to insert 3 or multiple arrays into 1 or 2 MySql tables

After googling for 2 days, Here is how to add multi-arrays into MySQL tables

Example we have 3 arrays:

$item= array(1, 2, 3, 4, 5);
$fruit= array('apple', 'banana', 'ananas', 'orange', 'lemon');
$price= array(32, 54, 26, 97, 47);

foreach($fruit as $key => $fruitName)
    {
    $query = " INSERT INTO fruits (item, fruit)
               VALUES ('$item[$key]', '$fruit[$key]')";
    mysql_query($query) or exit(mysql_error());
    $query = " INSERT INTO prices (item, price)
               VALUES ('$item[$key]', '$price[$key]')";
    mysql_query($query) or exit(mysql_error());
    }
This code is working as charm ! Enjoy.